NeuroCube
The Adventures of Working with Isaac Sim
This document details my experience setting up and working with NVIDIA’s Isaac Sim, a powerful but often challenging robotics simulation environment. It’s a collection of notes, workarounds, and insights gained from navigating the installation process, integrating with ROS2, and customizing the simulation for specific use cases. My hope is that sharing these “adventures” will help others avoid some of the same pitfalls.
Table of Contents
1. Compatibility Checker
The first thing was to ensure my machine was compatible with Isaac Sim. I run the compatibility checker provided in the installation guide, which verifies that my hardware and software meet the necessary requirements. This includes checking for a compatible GPU, sufficient RAM, and the operating system.
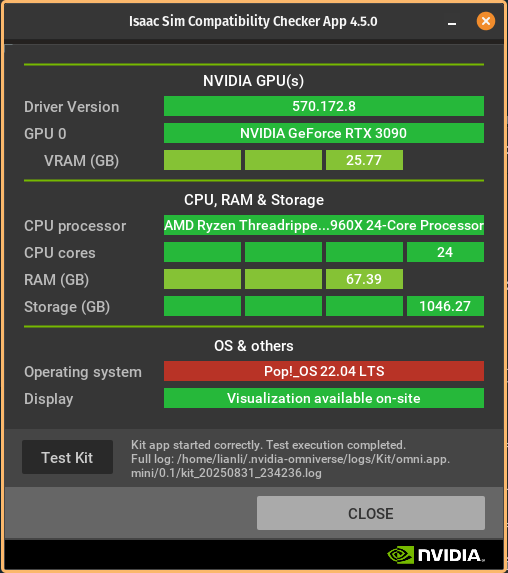
And… it seems like it’s all good! Except for maybe the operating system. I am running Pop!_OS, which is based on Ubuntu, but not officially supported. However, from my experience, there has not been any issues running Isaac Sim on Pop!_OS.
2. Downloading & Running Isaac Sim
The next step was to download Isaac Sim. I installed mine for Linux.
After the download was complete, I followed the rest of the instructions to create a new folder, extract the zip file, and navigate to the run script directory and run ./post_install.sh and then ./isaac-sim.selector.sh.
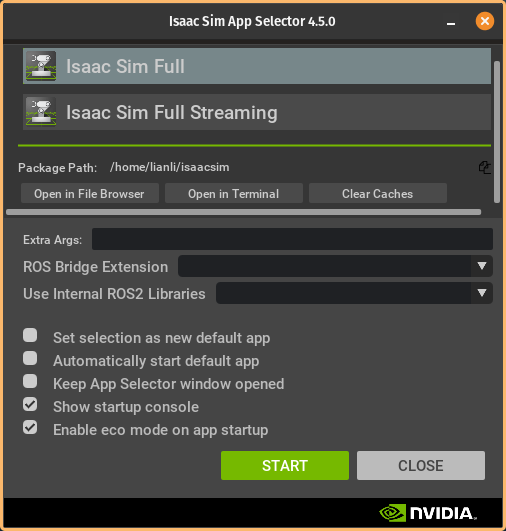
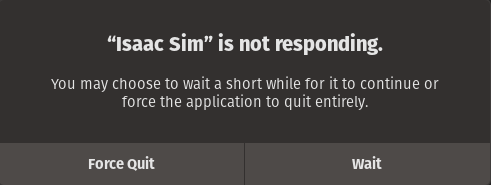
After selecting and starting up Isaac Sim Full, I was excited to see the Isaac Sim window opening up and thought, “That was easy!”, but then I realized the program initialization was taking longer than expected. The program repeatedly Stopped Responding, and I waited and waited… But then I noticed there was nearly no GPU usage by Isaac Sim. I checked the logs and found nothing wrong with them other than some warnings.
I tried running Isaac Sim again, this time with an & at the end of the command to run it in the background. I thought it might be some threading issue, where the main thread was blocked. To my surprise, this time it worked! The program no longer Stopped Responding but the viewport was not rendering anything.
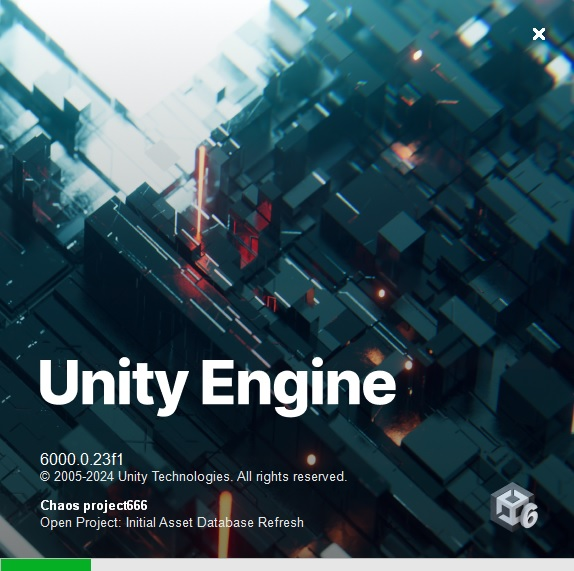
After some more debugging, I realized the solution was very simple… Being patient and giving the program more time to initialize properly (in my case, 5-10 minutes) seemed to do the trick. It appears that when Isaac Sim first initializes, it has to compile a lot of shaders and assets in the CPU, not in the GPU. This makes sense because this is similar to how some game engines work, where the initial loading phase can be CPU-bound before the GPU takes over for rendering. I recall when I was working with Unreal Engine and Unity, the initial loading times could be quite long as well, but they have a much more intuitive loading screen that provides feedback to the user, which is something Isaac Sim lacks.
vs.
and

* C’mon NVIDIA! You can do better than this!
Although there were a lot of warnings in the logs, they seemed to be harmless and did not affect the overall functionality of the simulator.
Setting Up A Simple Scene
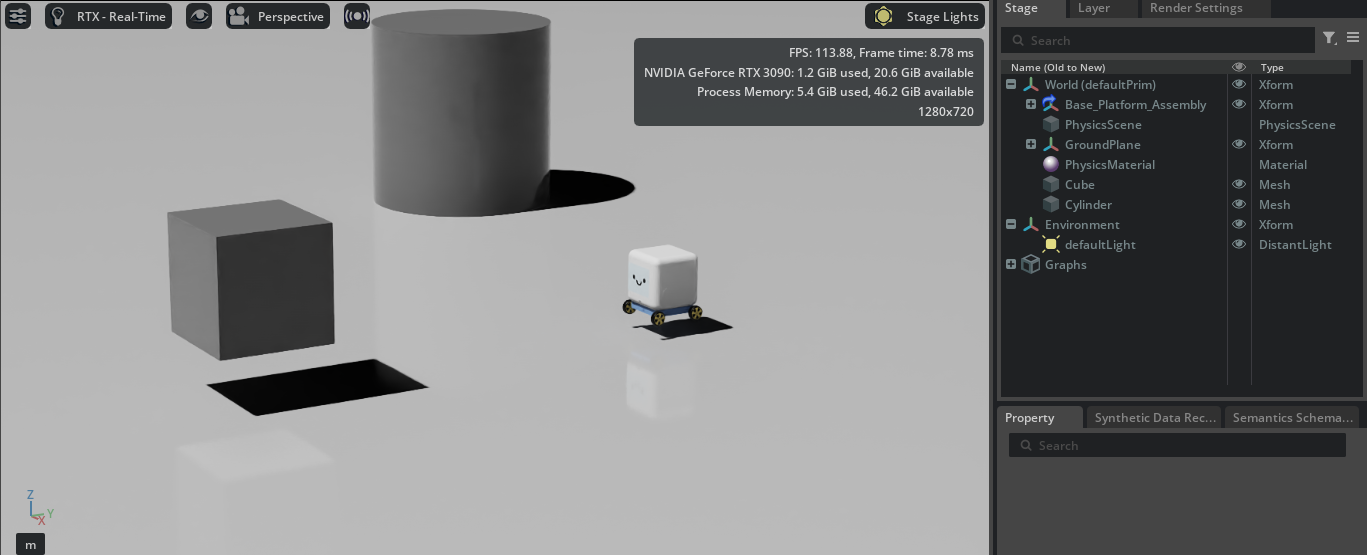
From there, I took a brief look at the quick start examples, Quick Start With Isaac Sim and Quick Start With a Robot. Using the knowledge I gained from these examples, I was able to set up my own simple scene with my robot and some objects.
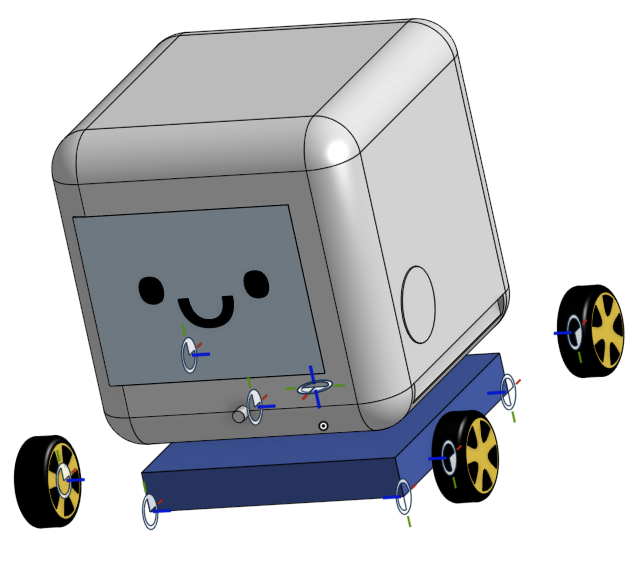
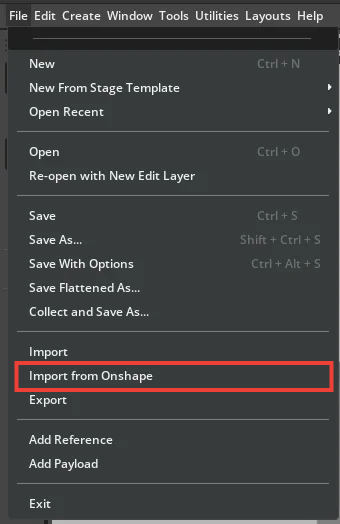
For my case, I modeled the robot using Onshape and could import it into Isaac Sim using the handy Import from Onshape option. The rest was just creating a Physics Scene, a Ground Plane, a Distant Light source, as well as some meshes such as a Cube and a Cylinder. The last, which is optional, was creating a Physics Material for my robot’s wheels to match the real robot.
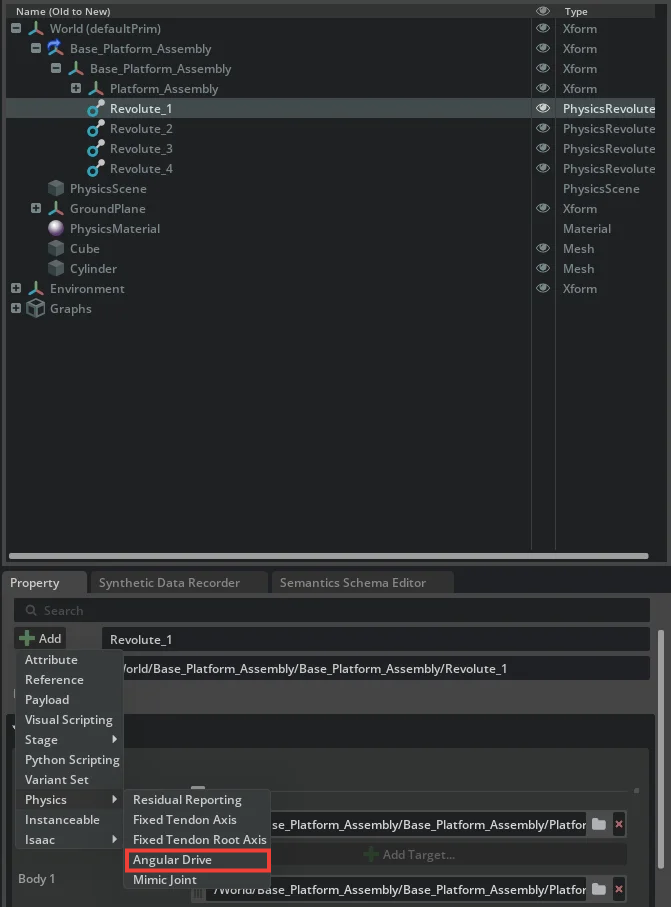
Setting Up Angular Drive and Differential Controllers
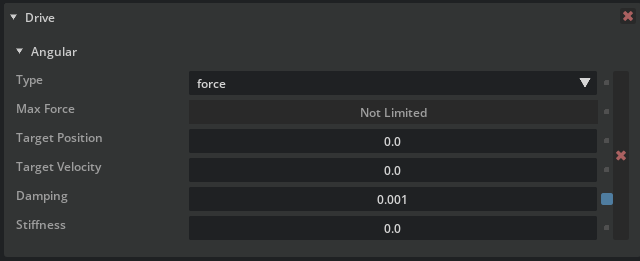
I had already previously defined the joints in Onshape, so they were imported into Isaac Sim along with the robot. However, I had to set up the Angular Drive component for each joint to control the movement of the wheels. The key parameter here is the Damping value, which controls how quickly the wheel stops spinning when no torque is applied. I found that a value of 0.001 worked well for my robot (through trial and error), but this may vary depending on the specific robot and its dynamics.
Here is what happens if you do not tune this parameter correctly:
vs. what happens when tuned correctly:
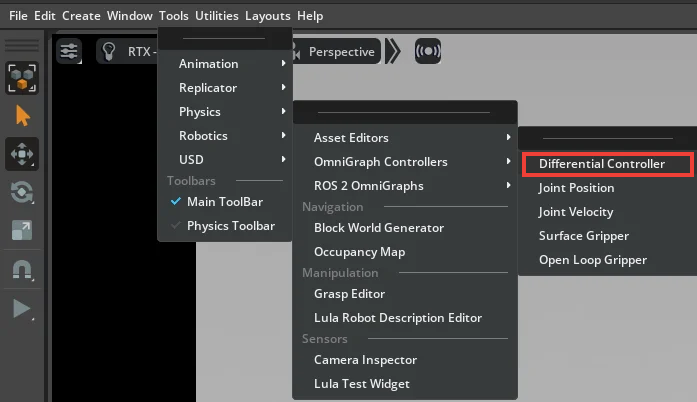
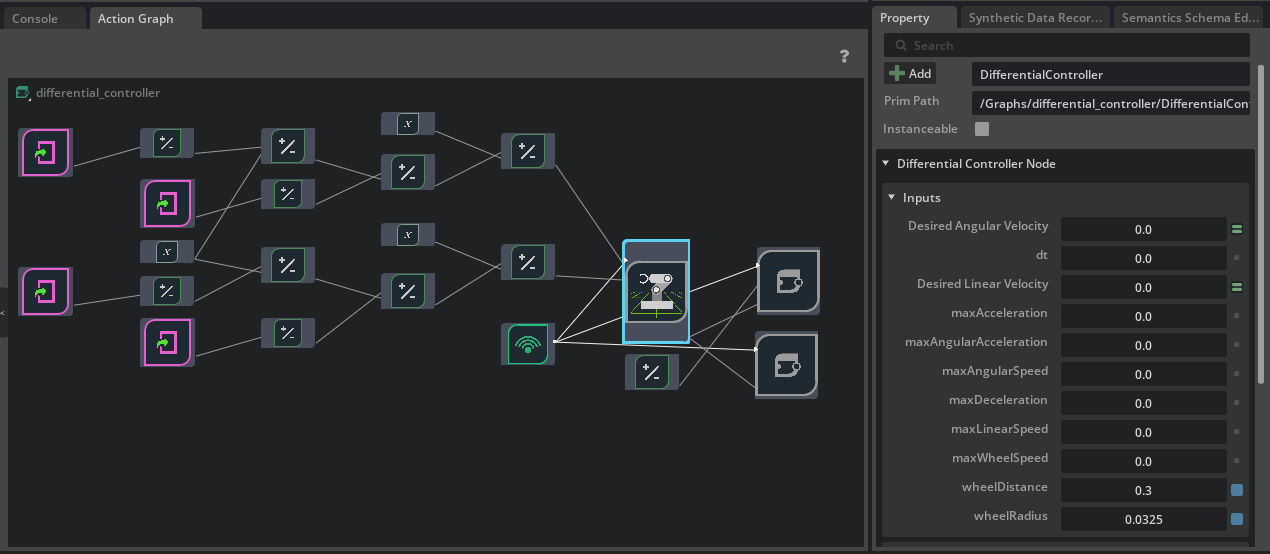
To control the robot using velocity commands, it was necessary to set up a differential controller. This involved creating a Differential Controller Action Graph. The most important thing is to ensure that the wheel radius and the distance between the wheels are correctly set to reflect the real robot. In my case, the wheelRadius is 0.0325 meters and the wheelDistance is 0.3 meters.
Making The Scene More Fancy!
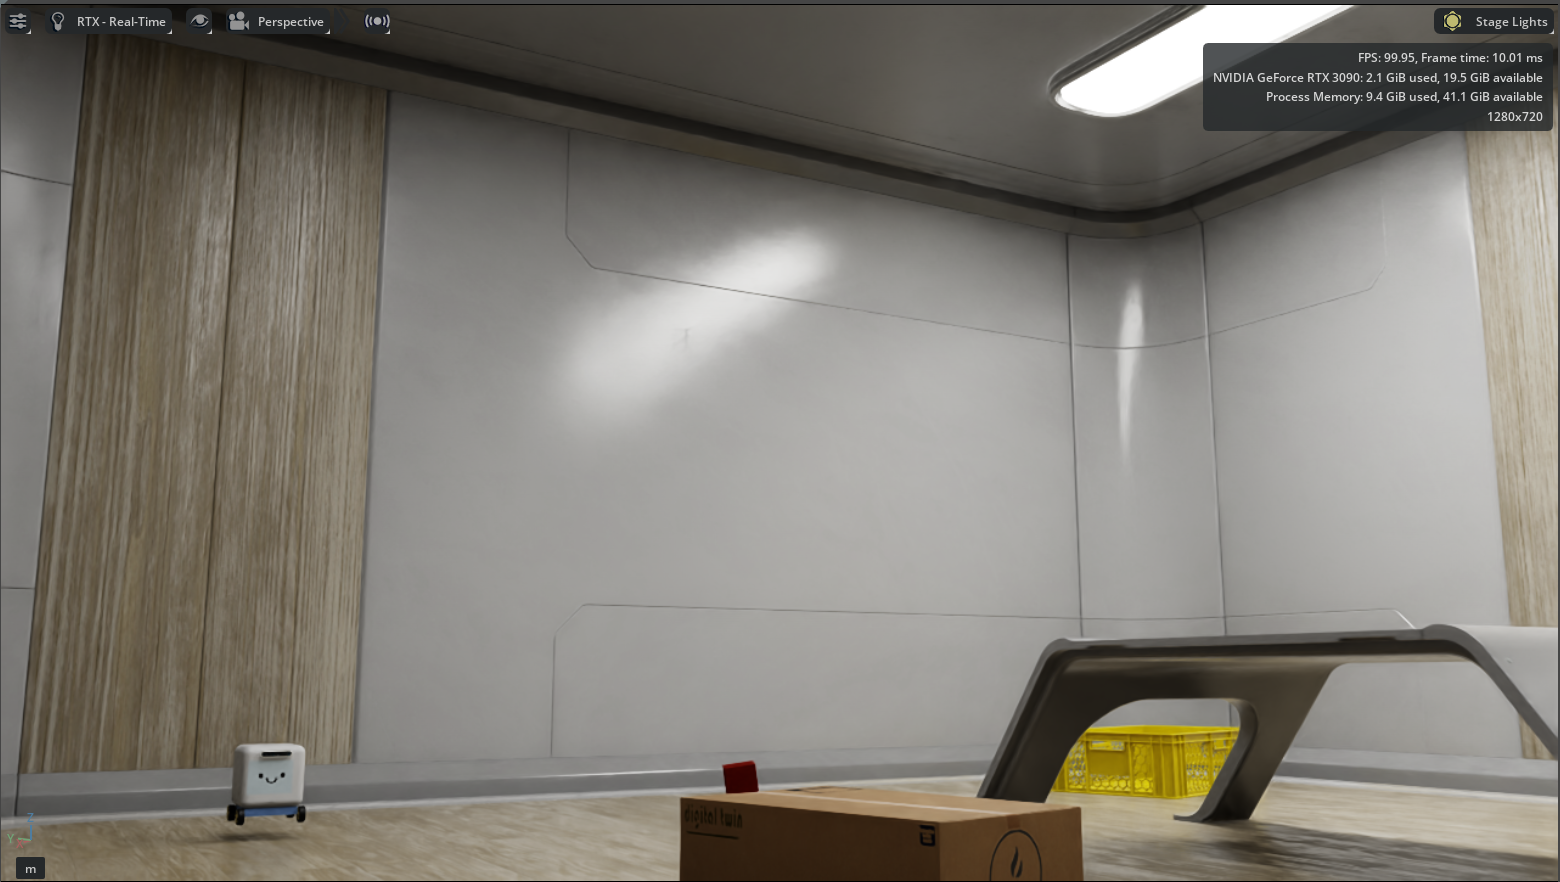
I tried to make use of more realistic environments and objects to better reflect the real world. Luckily, Isaac Sim comes with a simple scene preset environment that I could use as well as many object props.
Now, I can move the robot around by manually inputting velocity commands or using the WASD keys, but my goal is to make it so that a navigation stack can control the robot rather than me doing it manually. At this point, it is ALMOST possible to publish commands to an ROS2 topic such as /cmd_vel to move the robot accordingly. The next step is to set up the ROS2 environment and ensure that Isaac Sim can communicate with ROS2.
3. Isaac ROS (Robot Operating System) Setup
From my experience, I recommend using a docker image from Isaac ROS Common provided by NVIDIA for setting up and using ROS2 with Isaac Sim. This is because setting up ROS2 and all the necessary dependencies can be quite challenging, especially when trying to ensure compatibility with Isaac Sim, but the docker images account for all of that. Before using the images, I spent countless hours trying to ensure all the dependencies were correctly installed and compatible, only to run into various issues that prevented any progress at all.
VSLAM
The first thing I wanted to look at was VSLAM (Visual Simultaneous Localization and Mapping). I followed the Isaac Ros Visual SLAM Quick Start, using Isaac ROS Common and nvidia-container-toolkit to set up the ROS environment.
In the docker container, I also have access to RVIZ, which is a 3D visualization tool for ROS that allows me to visualize the robot’s sensor data and state information in real-time. Running the example quick start along with the pre-configured RVIZ will show the following:

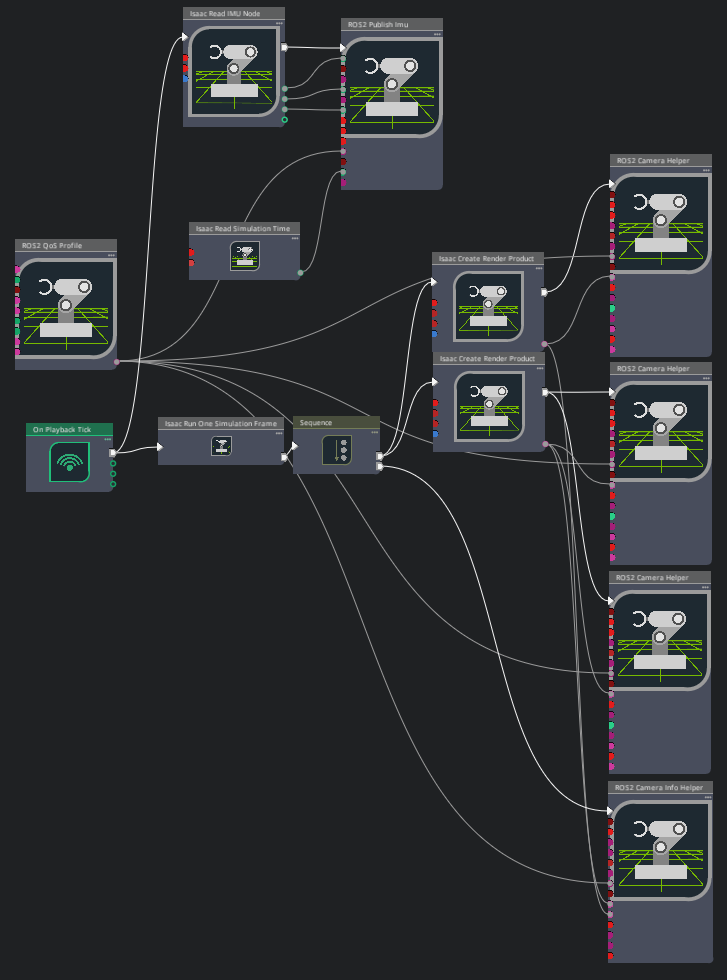
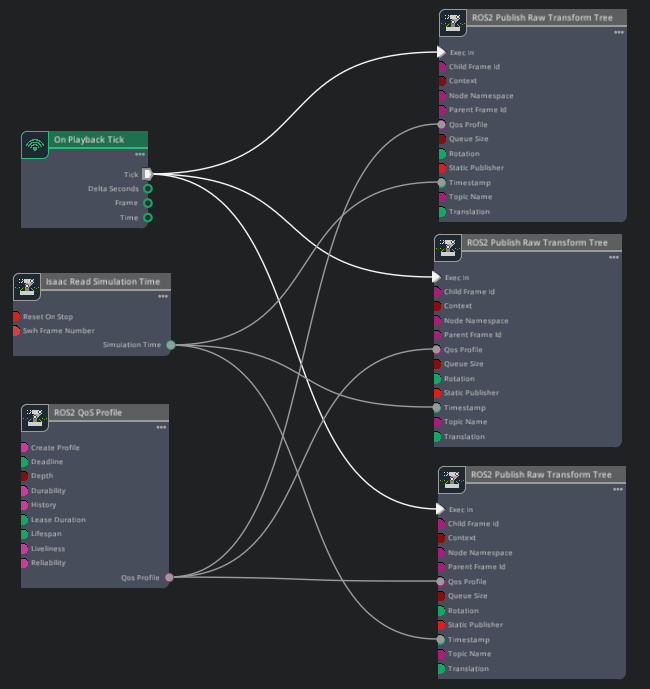
However, I wanted to get VSLAM working with my own robot. Using the sample scene as a reference, I created a similar action graph like the following to publish camera streams and imu streams from Isaac Sim to ROS2 topics. I also made sure to publish transform trees (TF) linking the camera and imu frames to the robot’s base frame.
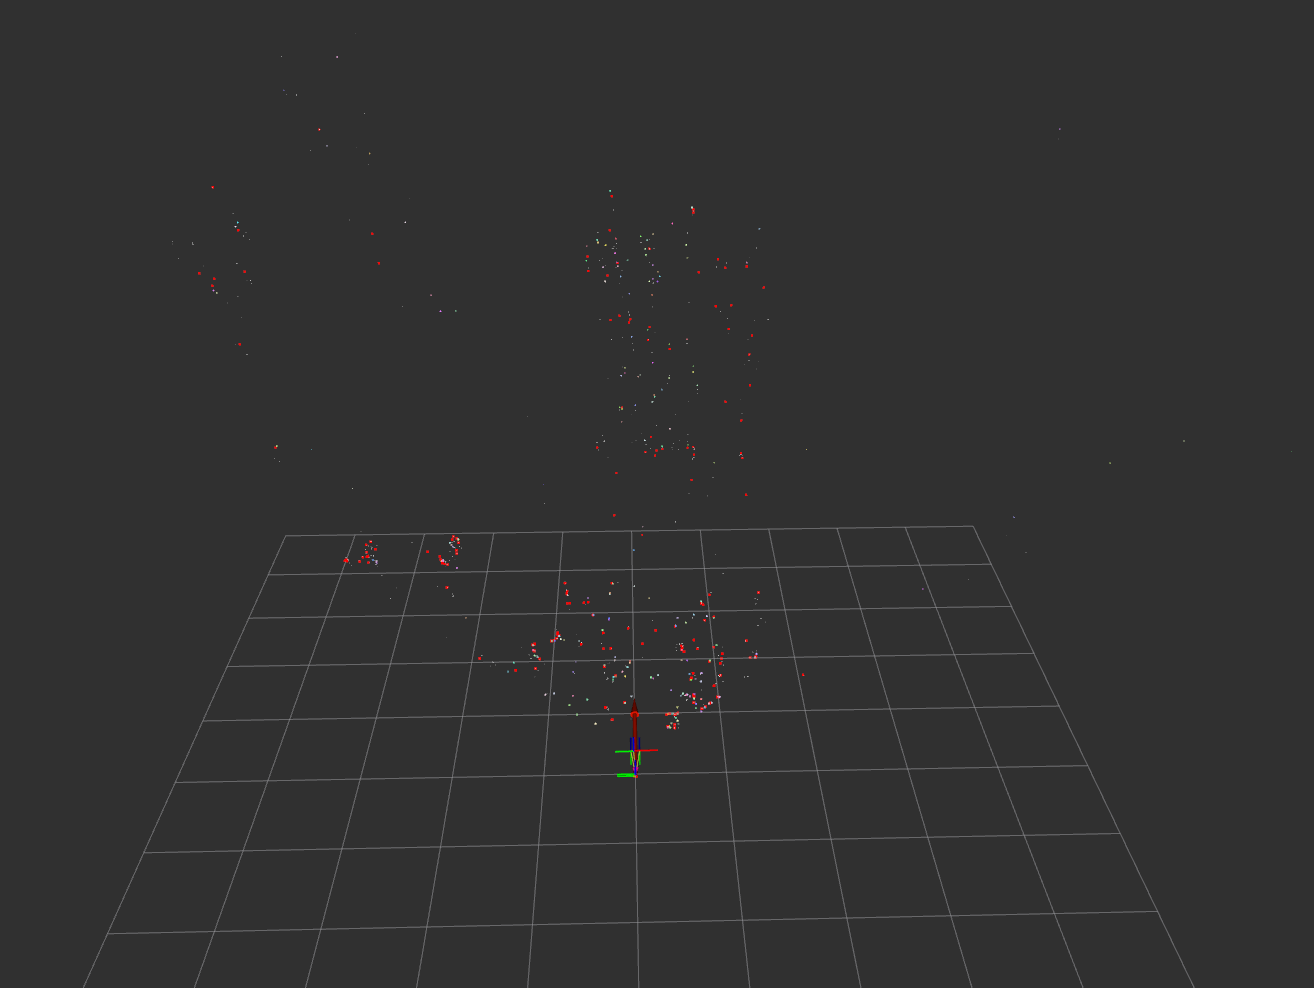
Then, just by running the simulation in Isaac Sim and launching the VSLAM node using ros2 launch isaac_ros_visual_slam isaac_ros_visual_slam_isaac_sim.launch.py, there are now point clouds in the RVIZ window. The points represent the 3D features being tracked and mapped by VSLAM.
Nvblox
Next, I looked into setting up Nvblox for 3D scene reconstruction. I followed the Isaac Ros Nvblox Quick Start. Running the ROS bag file provided in the quick start along with the pre-configured RVIZ will show the following:
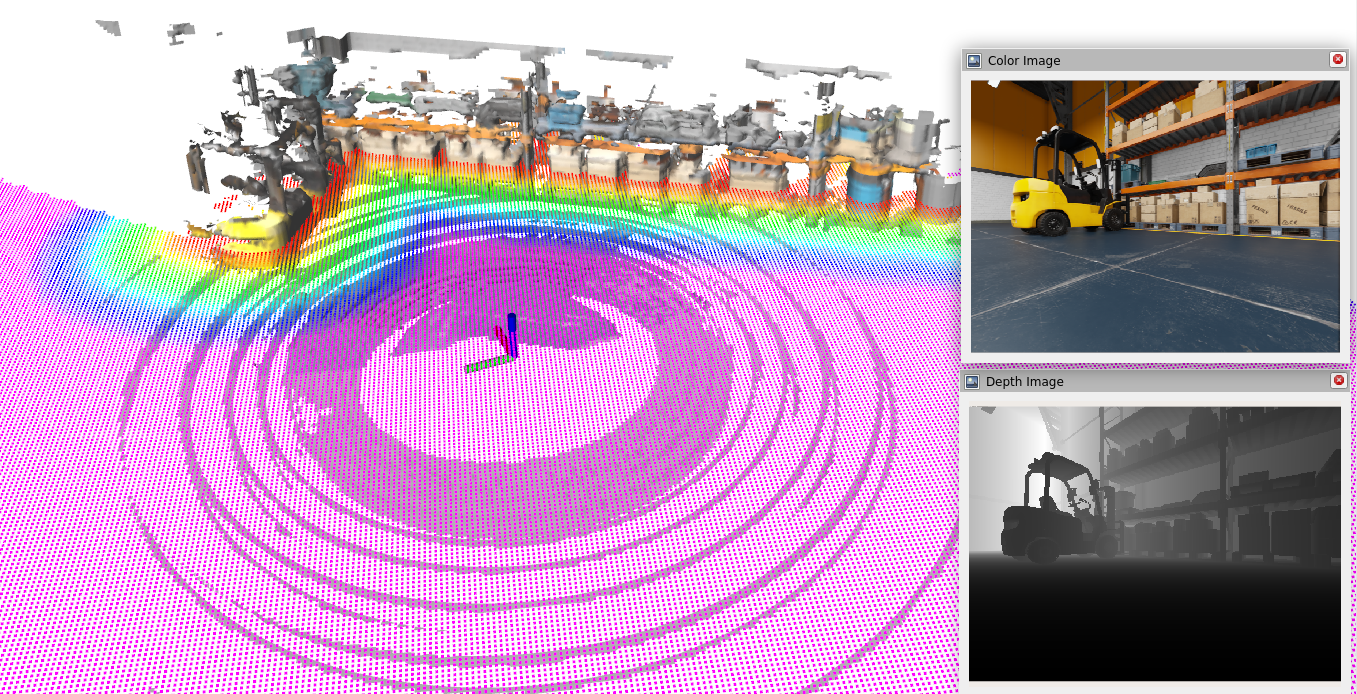
Using the same action graph as before with VSLAM, I was able to publish the necessary camera streams and imu streams from Isaac Sim to ROS2 topics which Nvblox already subscribes to. I then launched the Nvblox node using ros2 launch nvblox_examples_bringup isaac_sim_example.launch.py. This gives a dense 3D reconstruction of the environment as voxels as well as a costmap that can be used for navigation planning.

Nav2
Finally, I integrated Nvblox with Nav2 for navigation planning. By default, the Nvblox node already publishes a costmap that Nav2 can use for path planning. It also integrates a Nav2 plugin that allows Nav2 to subscribe to the costmap and use it for navigation. In RVIZ, it is possible to click and drag at a point to set a goal position and orientation for the robot.
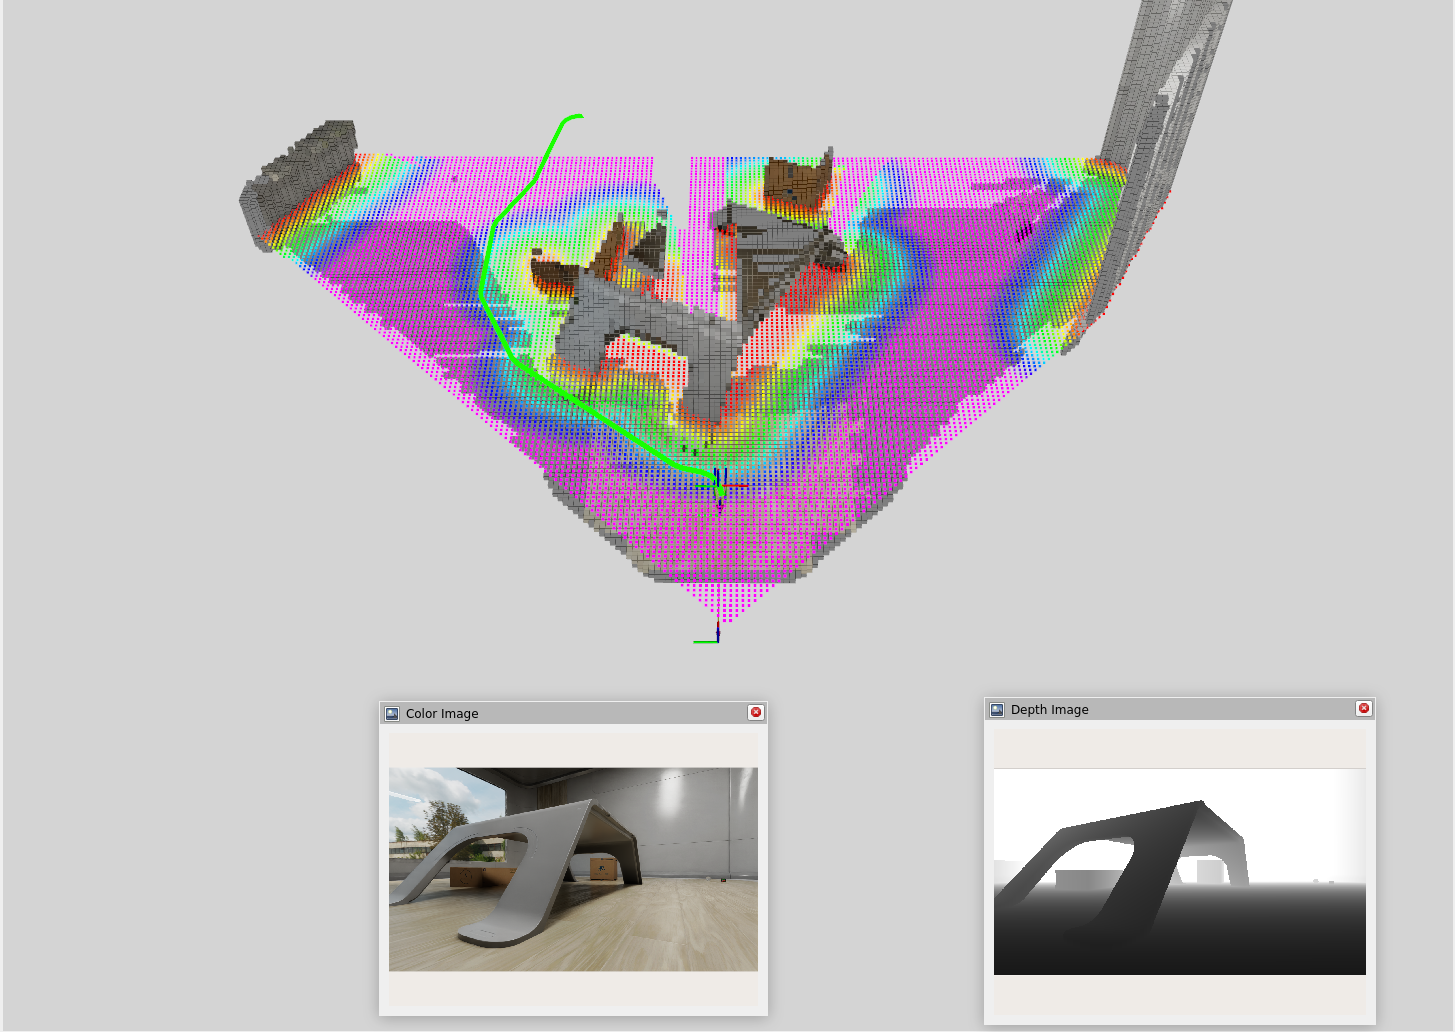
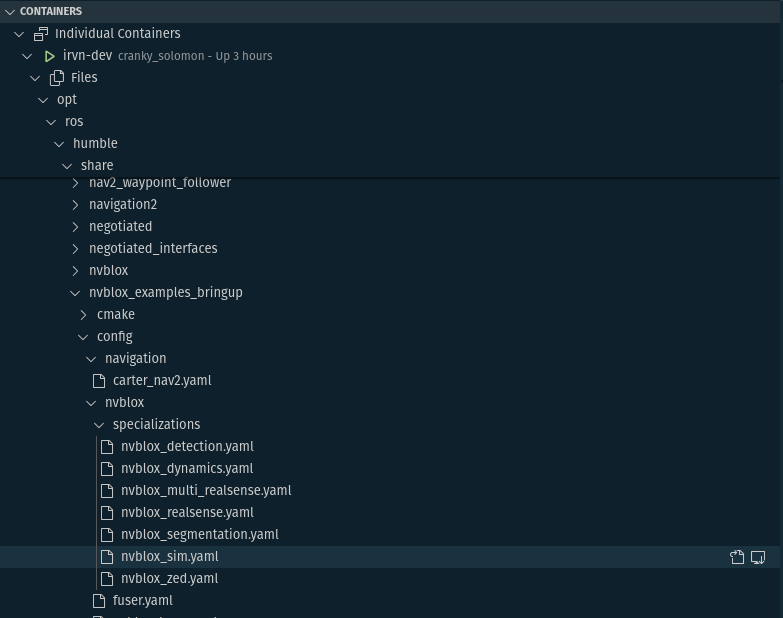
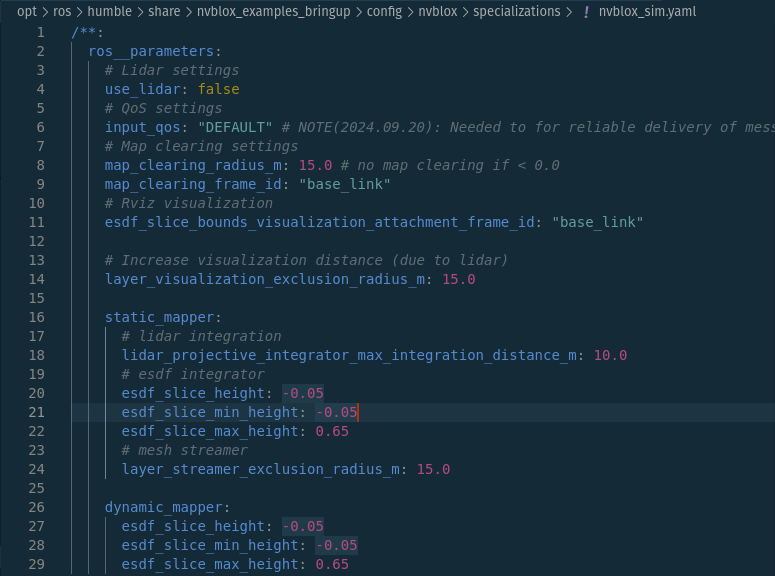
In particular, it’s important to set the esdf_slice_min_height and esdf_slice_max_height parameters in the Nvblox configuration file (.yaml) to match the capabilities of the robot. These parameters determine the vertical extent of obstacles that the costmap considers. My robot tips easily over small obstacles, so I needed to set the min height to be nearly exactly at ground level so that all ground obstacles are accounted for in the costmap. These parameters can be found in the nvblox_sim.yaml file located in the /opt/ros/<ros_distro>/share/nvblox_examples_bringup/config/specializations directory in the docker container. For my case, I set esdf_slice_min_height to -0.05 and esdf_slice_max_height to 0.65.
What happened when the min height was not low enough:
Committing docker container
To save any changes and packages that were installed, the easiest way I found was to commit the docker container. This ensures that the next time I launch the docker container, I won’t have to redo all the setup and installation steps again.
To find out the <container_id>, use the command:
docker ps -a
This will list all the containers, and in particular, the ID of the container.
CONTAINER ID    IMAGE        COMMAND                    CREATED        STATUS        PORTS        NAMES
971c5c1107c4    irvn-dev     "/usr/local/bin/scri…"     4 hours ago     Up 4 hours                 cranky_solomon
To commit the docker container, use the following command:
docker commit <container_id> <new_image_name>
To confirm that a new image has been created, use the command:
docker images
This will list all the images on the system, and the new image should appear in the list.
REPOSITORY    TAG        IMAGE ID        CREATED            SIZE
irvn-dev      latest     dbd3eedcdbf6    5 seconds ago      38.9GB
The other way is to create a new Dockerfile that inherits from the base image and includes all the necessary installation commands. Here is a general guide for how to do that.
Common Pitfalls
Ensure the Isaac Sim container/host and the ROS container can communicate with each other.
- After running both Isaac Sim and an ros2 node, run the command
ros2 topic listin the ROS container; you should see topics published by Isaac Sim.- If not, check that they are on the same network and that you have correctly configured the ROS_DOMAIN_ID environment variable in both environments. If the ROS_DOMAIN_ID is different across systems on the same network, they won’t be able to communicate.
- If the two are not on the same network, you need to configure DDS middleware such as Fast DDS or Cyclone DDS to allow communication across different networks. This is a more advanced topic and may require additional configuration.
Check if there are multiple publishers publishing to the same topic.
- While following some of the tutorials provided by NVIDIA or elsewhere online, you may have set up nodes that publish Odometry data to the
/odomtopic. However, VSLAM already does this as part of its localization process. This leads to conflicting published data with varying timestamps which prevents localization completely.- Be sure to double check your topics using
ros2 topic listandros2 topic info <topic_name>to see if there are multiple publishers publishing to the same topic.- If you find multiple publishers, you can either remove the extra publishers or remap the topics to different names to avoid conflicts.
Remap any topic names as needed to match what each node expects to publish and expects to subscribe to.
- For example, if your camera in Isaac Sim is publishing to
/camera/color/image_rawbut VSLAM expects the topic to be/camera/image, you can remap the topic in your launch.py file or using a command line argument when launching the node.
Confirm the forward direction of your robot’s mesh in your CAD software.
- In my case, the forward direction in Onshape was along the Y-axis, but in Isaac Sim, the forward direction is along the X-axis. This caused the robot to move sideways when I published velocity commands.
- To fix this, I had to rotate the robot mesh by 90 degrees around the Z-axis in Onshape to align the forward direction correctly. (You could also rotate it in Isaac Sim, but it would take more work to reconfigure everything in Isaac Sim to work with a different axes convention than to just ensure it is aligned correctly from the start.)
Continuous Learning and Exploration
There is still much to learn about the wilds of Isaac Sim, and I am continuously updating this document as I discover new things and overcome new challenges.